
Setting up autopay on a Capital One credit card sounds simple. But if you’ve ever stared at the payments screen wondering which option to pick, or set it up only to wonder if it actually worked, you’re not alone. I’ve seen cardholders miss a payment while thinking autopay was running, and that kind of mistake costs money and can ding your credit score.
The good news is that setting up Capital One autopay correctly takes less than five minutes once you know exactly what to do.
In this guide, I’ll walk you through every step for both the app and the website, plus the timing rules, payment amount choices, and what to do if something goes wrong.
At a Glance
This guide explains how to set up Capital One credit card autopay using both the mobile app and desktop site, covering payment amount options, timing rules, first-cycle coverage, verification steps, and what to do when autopay fails.
Core Facts:
- Capital One autopay offers three payment amount options: minimum payment, statement balance, and a fixed custom amount (minimum $35). Paying the full statement balance each month avoids interest charges entirely.
- Autopay posts on your payment due date each month. Capital One initiates the ACH debit from your bank account 1 to 3 business days before that date.
- On the desktop site, autopay is found under the “I Want To…” menu on your card account page. On the mobile app, it is in the Payments tab, separate from the “Make a Payment” button.
- If autopay is set up within 3 days of a due date, it may not process until the following billing cycle. Making a manual one-time payment for the current month is recommended in that situation.
- A failed autopay due to insufficient funds or a closed bank account can result in a returned payment fee of up to $40. Capital One typically reports missed payments to credit bureaus only after 30 days past due.
- Autopay does not automatically update when a linked bank account is changed or closed. The payment source must be updated manually in autopay settings before the old account is closed.
Best for:
- Capital One cardholders who have been paying manually each month and want to automate payments to protect their credit score and avoid missed due dates.
- New cardholders setting up autopay for the first time who need to understand the payment amount options, timing rules, and verification steps before completing setup.
- Existing autopay users who need to change their linked bank account, update their payment amount type, or troubleshoot a failed automatic payment.
What You Need Before Setting Up Capital One Autopay
Before you open the app or website, take 60 seconds to make sure you have everything ready. Stopping mid-setup because you’re missing a piece of information is more common than it sounds.
You’ll need:
- An active Capital One online account. You need a working username and password. If you’ve never logged in before, register at capitalone.com first.
- Access to the Capital One mobile app or desktop site. Either works. The steps are slightly different for each, and both are covered below.
- A linked checking account. Capital One pulls autopay funds from a bank account via ACH transfer. You’ll need the routing number and account number for that checking account.
- The bank account must be in your name. Joint accounts are generally fine, but the account name must match your profile.
If you’re a Capital One 360 checking account holder, your internal account is already connected to your profile. You can select it during setup without entering routing or account numbers manually.
⚠️ Mistake to Avoid: Don’t confuse a debit card number with a checking account number. Capital One autopay uses ACH transfers, which require your bank’s routing number and your checking account number, not a card number. These are printed on your checks or available in your bank’s app under account details.
How to Add a Bank Account to Capital One Before Setup
If you haven’t linked a checking account yet, you’ll need to do that first. The autopay setup screen won’t let you proceed without one.
On the desktop site:
- Log in at capitalone.com and click your name or account icon in the top right.
- Select “Profile” or “Settings.”
- Look for “Payment Methods” or “Bank Accounts” and click “Add a Bank Account.”
- Enter your bank’s routing number and your checking account number.
- Click “Save” or “Add Account.”
On the mobile app:
- Tap the profile icon (top right of the home screen).
- Go to “Settings” then “Payment Accounts.”
- Tap “Add Bank Account” and enter your routing and account numbers.
Some external bank accounts require micro-deposit verification. Capital One will send two small deposits (usually a few cents each) to your bank within 1 to 2 business days. You then confirm the exact amounts to verify ownership. Until the account is verified, you can’t use it for autopay. Plan if your due date is soon.
Once the account shows a “Verified” status, you’re ready to set up autopay.
How to Set Up Capital One Autopay on the Website (Desktop)
The desktop site gives you the most complete view of your autopay options. Use this path if you’re on a computer or prefer a larger screen.
Step 1: Sign in to your account. Go to capitalone.com and log in. On the main account dashboard, you’ll see a list of your cards and accounts.
Step 2: Select the correct credit card. Click on the credit card you want to set up autopay for. This takes you to the account detail page for that specific card.
Step 3: Find the “I Want To…” menu. On the account homepage for your card, look for a button or dropdown labeled “I Want To…” It’s usually located in the top right area of the card detail view. Click it.
Step 4: Select “Set Up AutoPay.” In the dropdown menu, you’ll see several options. Look for “Set Up AutoPay” or “Manage AutoPay.” Click it. Do not click “Make a Payment” — that option is for one-time payments only and won’t create a recurring schedule.
Step 5: Choose your payment amount. This is the most important decision in the whole process. You’ll see three options:
- Minimum payment
- Statement balance
- Fixed payment (custom amount)
Each option works differently and has different financial consequences. See the full breakdown in the next section before making this choice.
Step 6: Select or confirm your bank account. Choose the checking account you want Capital One to pull from each month. If you’ve already added and verified one, it will appear in the dropdown. If it’s not listed, you’ll need to add it first (see the section above).
Step 7: Confirm the payment date. Capital One schedules autopay to post on your payment due date each month. In most cases, you don’t need to set a date manually. The system uses your existing due date. Review the confirmation screen to verify the date shown is correct.
Step 8: Submit and save the confirmation. Click “Confirm” or “Set Up AutoPay.” A confirmation screen will appear showing your selected payment amount, the bank account being used, and the date. Take a screenshot or note the confirmation number. Capital One will also send a confirmation email to the address on your account.
How to Set Up Capital One Autopay on the Mobile App
The app path is nearly identical in function but uses a different navigation layout. These steps reflect the current Capital One mobile app interface.
Step 1: Open the Capital One app and sign in. Use your username and password, or biometric login if you have that enabled. The app’s home screen shows your card accounts.
Step 2: Tap on the credit card you want to set up autopay for. This opens the account detail view for that card.
Step 3: Tap the “Payments” tab or the payment icon. Look at the bottom navigation or within the card detail screen for a “Payments” tab. Tap it.
Step 4: Look for “AutoPay,” not “Make a Payment.” This is the most common wrong turn on the app. The “Make a Payment” button processes a one-time transaction. You want the “AutoPay” option. It’s usually shown as a separate section below the one-time payment area, sometimes labeled “Set Up AutoPay” or “Manage AutoPay.”
Step 5: Tap “Set Up AutoPay” and choose your payment amount. The same three options appear here: minimum payment, statement balance, or fixed amount. Make your selection based on your financial situation (see the next section for guidance).
Step 6: Confirm the bank account. Select the checking account linked to your Capital One profile. If you need to add one, tap “Add Account” and follow the prompts to enter your routing and account numbers.
Step 7: Review the summary and confirm. The app will show a summary screen with your payment amount type, the bank account selected, and the scheduled date. Review everything, then tap “Confirm” or “Submit.”
Step 8: Save the confirmation. The app will display a confirmation screen. Take a screenshot. You’ll also receive a confirmation notification and email. Both are worth keeping until you’ve confirmed the first autopay actually processes.
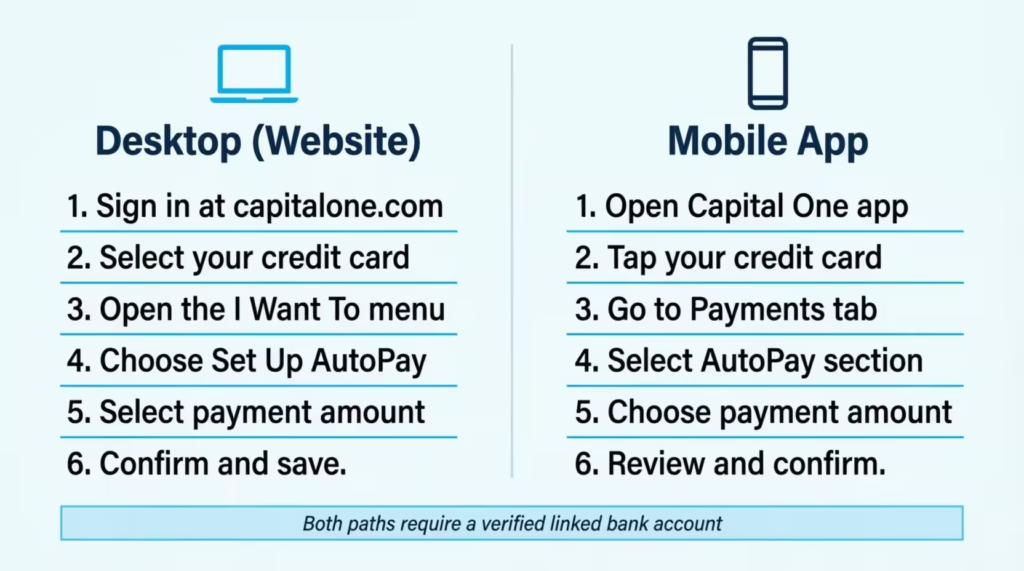
💡 Pro Tip: After setup, check the “Payments” or “AutoPay” section of the app one more time to confirm that a scheduled upcoming payment is showing. If you can see a future scheduled payment listed with the correct date and amount type, autopay is active.
Which Autopay Payment Amount Should You Choose?
Capital One gives you three options when setting up automatic payments. Picking the right one matters. Choosing the wrong option can cost you interest charges every month, or leave you paying more than your budget allows.
Option 1: Minimum Payment. This is the smallest amount Capital One will accept each month without charging a late fee. It changes based on your balance. You’ll see the exact amount on your statement each billing cycle.
Option 2: Statement Balance This is your total balance as of the day your billing cycle closed, shown on your monthly statement. Paying this in full each month means you carry no balance forward.
Option 3: Fixed Payment. This is a custom dollar amount you set yourself. Capital One requires the fixed amount to be at least $35. If your actual balance in a given month falls below $35, Capital One will only charge what you owe.
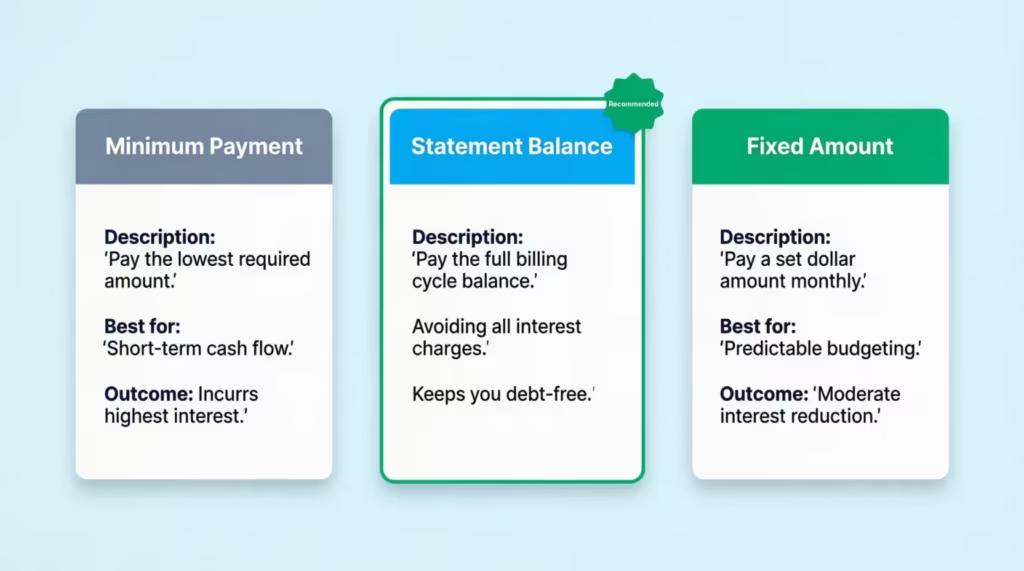
For most cardholders, the statement balance is the right choice. It pays off your card in full each cycle, which means no interest charges and no revolving balance building up over time. It also protects your grace period, which is the interest-free window between when your statement closes and when your payment is due.
If paying the full statement balance isn’t realistic for your current budget, a fixed amount above the minimum is the next best option. A custom amount gives you more control than the minimum while still reducing your balance faster.
The minimum payment option is fine as a safety net, but it shouldn’t be your only payment strategy if you carry a significant balance.
What Happens Financially With Each Autopay Amount Option
The financial difference between these three options is larger than most people expect.
Minimum payment: Say your statement balance is $1,200. Your minimum payment might be around $35. You pay $35, and Capital One applies interest to the remaining $1,165. At a typical APR of 20%, that’s roughly $19 in interest added in a single month. Over time, a minimum-only strategy turns a manageable balance into a long-term debt that costs you significantly more than the original charges.
Statement balance: You pay the full $1,200. No interest accrues. Your grace period resets. Next month starts at zero unless you make new purchases.
Fixed amount: Say you set $200 as your fixed payment. You pay $200 and interest accrues on the remaining $1,000. You’re making progress, but interest still applies to the unpaid portion. This option makes sense when you need payment predictability but want to pay more than the minimum.
The key rule: the only way to completely avoid interest charges on a Capital One credit card is to pay the full statement balance each month.
📌 Did You Know: If you set up autopay for the statement balance and make an extra payment before autopay processes, Capital One will reduce your autopay amount by what you already paid. So if your statement balance is $500 and you manually pay $100 first, autopay will only pull $400. You won’t be double-charged.
Understanding Capital One Autopay Timing
This is the section most people skip, and it’s the one that causes the most problems.
Capital One autopay is scheduled to post on your payment due date each month. According to Capital One’s autopay terms, funds are debited from your payment account within one to three business days after the payment date is submitted. The payment itself is scheduled to post on your due date, so Capital One starts the ACH debit process a few days beforehand to make sure the timing lands correctly.
What this means for the current billing cycle:
If you set up autopay today and your due date is in 4 or more days, there’s a reasonable chance autopay will cover this month’s payment. But Capital One needs enough lead time to schedule the debit. If you set up autopay just 1 to 2 days before your due date, it may not process until the following cycle.
The safest approach: if your due date is within the next 3 days when you set up autopay, make a manual one-time payment for this month and let autopay begin its regular schedule next cycle.
How autopay renews each month:
On the date the billing period closes, your next payment is automatically scheduled for your monthly due date. You don’t need to do anything. Capital One handles the scheduling after each statement closes.
Online payment cutoffs:
The deadline for making a payment is 12 midnight ET on your due date, except on the statement closing date when the deadline is 8 p.m. ET. Autopay is processed automatically by Capital One, so you don’t need to worry about hitting the cutoff manually, but this is useful to know if you’re making a backup one-time payment.
What to Do If Your Due Date Is Coming Up When You Set Up Autopay
If your due date is within the next 3 days, don’t assume autopay will cover it. Take these steps:
- Make a manual one-time payment now. Log in to the website or app, select “Make a Payment,” choose your payment amount (minimum or full balance), and submit it for today or a date before your due date.
- Complete the autopay setup as normal. Even if autopay won’t help you this cycle, get it set up now so it’s ready for every future cycle.
- Check your account in 2 to 3 days. Confirm the one-time payment posted. Then confirm the autopay schedule shows the next month’s payment queued.
- Don’t double-pay. If you make a manual payment for the full statement balance this month, autopay will handle next month’s statement balance. You won’t be charged twice because Capital One recalculates the amount based on your remaining balance after any payments made before the autopay date.
How to Confirm Your Capital One Autopay Is Active
After completing setup, don’t just close the app and assume everything worked. It takes less than a minute to verify that autopay is actually running.
On the desktop site:
- Sign in and go to your card account detail page.
- Click “I Want To…” and select “Manage AutoPay” or look for a “Payments” section.
- You should see a screen showing your autopay status, the payment amount type, the bank account on file, and the date of the next scheduled payment.
On the mobile app:
- Tap your card and go to the “Payments” tab.
- Look for an “AutoPay” section. An active autopay shows the next scheduled payment, the amount type, and the linked account.
- If autopay is active, you’ll typically see a line like “Next AutoPay: [Amount Type] on [Date]” or a green status indicator.
What active autopay looks like vs. what inactive autopay looks like:
Active autopay displays a scheduled upcoming payment with the amount type and date clearly shown. If the autopay section shows no upcoming payment or asks you to “Set Up AutoPay” after you’ve tried to set it up, then something went wrong. Go back through the setup steps and try again.
Confirmation email:
Capital One sends a confirmation email when autopay is enrolled. Check your inbox (and spam folder) for a message from Capital One. The email will confirm the payment amount type and the bank account selected. If you don’t receive an email within a few hours of setting up, log in and verify the setup was saved.
How to Change Your Capital One Autopay Settings
One of the biggest concerns people have before turning on autopay is that they’ll be locked in. You’re not. Capital One lets you change your autopay settings at any time.
To access your autopay settings:
- On the desktop: Log in, go to your card account, click “I Want To…” and select “Manage AutoPay.”
- On the mobile app: Tap your card, go to “Payments,” then find the “AutoPay” section. Tap “Edit AutoPay” or “Manage.”
What you can change:
- The payment amount type (switch from minimum to statement balance, or adjust your fixed amount)
- The bank account that autopay pulls from
- You cannot change the payment date itself, since Capital One ties autopay to your existing due date. If you want to change the due date, that’s done separately through account settings
When changes take effect:
Changes to autopay settings apply to the next scheduled payment that hasn’t yet been processed. If your next autopay is only a day or two away, the change will likely apply to the cycle after that. Capital One shows you the effective date when you submit a change.
If you need the change to apply immediately (for example, your bank account changed and autopay is pulling from a closed account), don’t wait. Update the settings as soon as possible and verify that the new account is showing as the active source.
How to Cancel Capital One Autopay
Canceling autopay is done through the same settings screen you use to manage it.
- Go to “Manage AutoPay” on the desktop or the AutoPay section in the app.
- Look for a “Cancel AutoPay” or “Turn Off AutoPay” option.
- Confirm the cancellation when prompted.
- Capital One will show a confirmation that autopay has been turned off.
Timing: To avoid having autopay process a payment you’ve decided to cancel, make the change as early as possible in the billing cycle. If your due date is very close, the current month’s payment may already be scheduled and in progress.
Once autopay is canceled, you’re responsible for making manual payments each month. Capital One will still send payment reminders, but no automatic deduction will occur.
What to Do If Capital One Autopay Fails
Autopay is reliable, but it’s not guaranteed. A few specific scenarios can cause it to fail, and knowing what to do immediately makes a significant difference.
Common reasons autopay fails:
- Insufficient funds in the linked checking account on the autopay date
- A closed or frozen bank account is still listed as the payment source
- A temporary hold or freeze on the linked bank account
- A technical error during ACH processing (rare, but it happens)
How Capital One notifies you:
If autopay fails, Capital One typically alerts you by email and through an app notification. The alert will note that a payment was returned or could not be processed. Check your notifications and email around your due date if you’ve had any changes to your linked bank account.
What happens to your account:
If an autopay fails or a manual payment is rejected due to insufficient funds, Capital One will charge a returned-payment fee of up to $40. They will also consider the payment missed for that cycle. A missed payment can also trigger Capital One’s penalty APR rules if it goes more than 60 days past due. Capital One confirms that a returned payment fee may be charged if your payment fails due to insufficient funds in your payment account.
What to do immediately after a failed autopay:
- Log in to your Capital One account as soon as you’re notified.
- Make a manual payment right away. Use the “Make a Payment” option and submit for the same day.
- Call Capital One customer service at the number on the back of your card. If it’s your first time experiencing a failed payment, ask for a courtesy waiver of the returned payment fee. Capital One has been known to waive first-time fees for customers with a solid payment history.
- Update your autopay settings to use a bank account that has sufficient funds before the next billing cycle.
Capital One typically reports late payments to credit bureaus only after 30 days past due. Payments that are 1 to 29 days late usually result in a fee but don’t appear on your credit report. This means that if you catch a failed autopay quickly and pay within a few days, your credit score is protected.
What to Do If Your Bank Account Changes After Autopay Is Set Up
This is one of the most overlooked autopay risks, and it catches people off guard.
Autopay does not automatically update when your bank account changes. If you close a checking account, switch banks, or open a new account, your Capital One autopay still has the old account on file. The next autopay attempt will be made against the old account, which may be closed or empty.
The fix is simple, but the timing matters:
Update your Capital One autopay bank account before you close the old account, not after. Log in to the autopay settings screen, remove the old account, and link the new one. Verify the new account shows as the active payment source before you close anything at your bank.
If you’ve already closed the old account and autopay has failed because of it, follow the steps in the section above. Make a manual payment immediately, then update the linked account in your autopay settings to the new one.
Does Capital One Autopay Guarantee You Won’t Get a Late Fee?
Autopay is one of the best tools available for avoiding late fees. But it’s not an automatic guarantee. Understanding where it protects you and where it doesn’t helps you use it more effectively.
What autopay does protect you from:
Forgetting your due date. Losing track of a payment during a busy month. Accidentally missing a payment because you’re traveling. These are the scenarios autopay handles perfectly. For most cardholders, most months, autopay eliminates late payment risk.
What autopay does NOT protect you from:
- A payment failure caused by insufficient funds in your linked checking account
- A closed or changed bank account that autopay hasn’t been updated to reflect
- An incorrect setup that didn’t save (which is why verification matters)
- Technical issues during ACH processing
In any of these cases, the payment fails, and Capital One treats it as a missed payment regardless of whether you intended to pay.
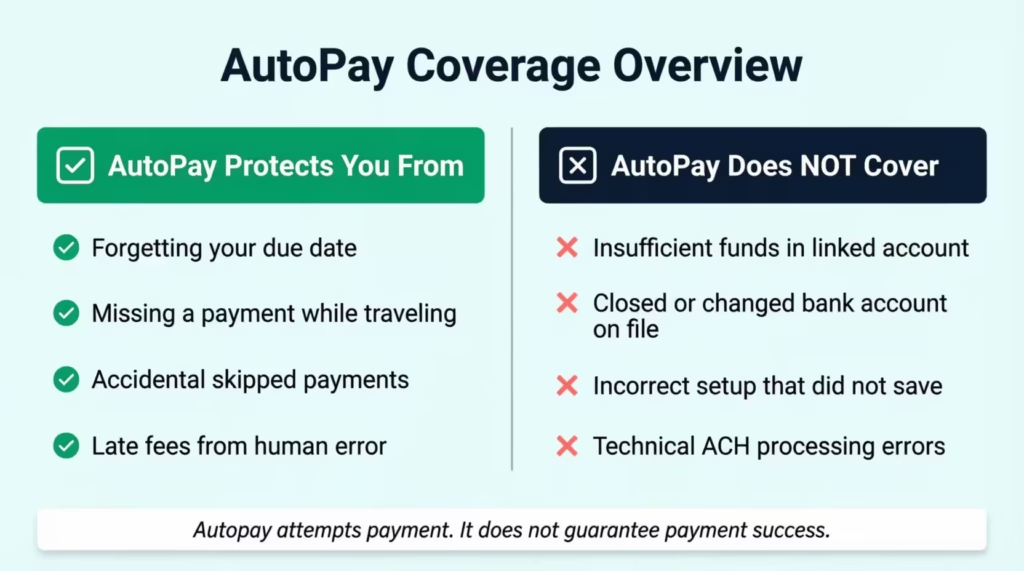
The critical distinction:
Autopay attempts to pay your bill on time. It does not guarantee payment success. The difference is important. An autopay attempt is only as reliable as the bank account it’s pulling from.
How to add a backup layer of protection:
- Turn on Capital One account alerts so you receive a notification a few days before each autopay process. This gives you time to confirm your bank account has enough funds.
- Use Capital One’s CreditWise tool or account notifications to monitor your account activity. Any unusual charges or alerts will show up there.
- Set a calendar reminder for 3 days before your due date to log in and confirm the upcoming autopay is scheduled.
Autopay combined with account monitoring is a much stronger protection than autopay alone.
Frequently Asked Questions (FAQs)
What does AutoPay do in Capital One?
Capital One AutoPay automatically pulls a payment from your linked checking account on your due date each month. You choose the amount type once during setup, and Capital One handles every future payment without you needing to log in.
Is it a good idea to set up autopay on a credit card?
Yes, for most cardholders, it’s one of the best habits you can build. It eliminates the risk of forgetting a due date, which protects your payment history, the single largest factor in your credit score.
How long does Capital One AutoPay take to process?
Capital One AutoPay posts on your due date, but the ACH debit from your bank account initiates 1 to 3 business days before that. You don’t need to trigger anything manually; the timing is handled automatically once autopay is active.
Does autopay hurt your credit score?
Autopay itself doesn’t hurt your credit score. A failed autopay can, though, because Capital One treats a returned payment as a missed payment, and if it goes uncorrected past 30 days, it gets reported to the credit bureaus.
What are the disadvantages of autopay?
The main risk is that autopay fails silently if your linked bank account has insufficient funds or has been closed. Unlike a forgotten payment, a failed autopay still results in a late fee and potential credit impact if you don’t catch it quickly.
Why isn’t Capital One AutoPay working?
The most common causes are insufficient funds in the linked checking account, a closed or changed bank account still on file, or a setup that didn’t save correctly. Log in to confirm autopay shows an active scheduled payment, and verify your linked account still has funds before each due date.
Is it better to use a debit card or a bank account for Capital One autopay?
Capital One autopay requires an ACH transfer from a linked checking or savings account. You can’t set up autopay using a debit card number. You’ll need your bank’s routing number and your account number to link the payment source.
Can I set up Capital One autopay without a checking account?
Capital One autopay requires a linked bank account using ACH transfer, so a checking or savings account is necessary. The only exception is for Capital One 360 account holders. They can link their internal accounts directly, so they don’t need to enter routing numbers.
Can I set up autopay if I just opened my Capital One account?
You can enroll in autopay as soon as your online account is active and a bank account is linked and verified. There’s no requirement to wait for a statement to close first, though your first autopay will process on the due date following the close of your first billing cycle.
Bottom Line
Setting up autopay on your Capital One credit card is an easy way to protect your credit score. It also helps you avoid the stress of late payments. The process itself takes just a few minutes, whether you’re using the app or the desktop site. The setup steps are clear: link a verified bank account, choose your payment amount, and confirm the schedule is active.
Based on how Capital One’s interest rules work, the statement balance option delivers the best outcome for most cardholders. It eliminates interest charges and keeps your grace period intact month after month. If a full balance payment isn’t possible every cycle, a fixed amount above the minimum is the next best choice.
Autopay is a strong tool, but it works best when you stay engaged. Check your linked account has enough funds before each due date and update your settings anytime your bank account changes. That combination covers almost every scenario where autopay could fail.
If this guide helped you get set up, share it with a friend who’s still paying manually every month. Consistent on-time payments are one of the biggest factors in building a strong credit score, and autopay makes that effortless for anyone who takes five minutes to set it up properly.