
You’re a college student. You’re ready to get your first credit card. Discover sounds like a great fit, but the application form is full of questions you’ve never had to answer before. What counts as income? Will applying hurt the credit score you haven’t even built yet? Which Discover student card is actually better for you? These are the exact worries that cause most students to close the tab and try again “later.”
The good news is that it’s easier to get approved for the Discover student credit card than you think. Just know what to fill in for each field and how to protect your credit before submitting.
This guide walks you through every step, from picking the right card to fixing a denial, in the order you’ll actually need it.
Key Takeaways
This guide explains how to apply for a Discover student credit card, covering how to choose between the two student card options, what income counts under the Credit CARD Act, how to use the pre-qualification tool to protect your credit score, and what to do if your application is denied.
Core Facts:
- Discover offers two student cards with no annual fee: the Cash Back card earns 5% on rotating quarterly categories (up to $1,500 per quarter after activation) and the Chrome card earns a flat 2% at gas stations and restaurants (up to $1,000 per quarter) with no activation required.
- Both cards include a first-year Cashback Match that automatically doubles all cash back earned at the end of the first year, with no minimum spend and no cap.
- Applicants under 21 can only report income they personally have access to, including wages, work-study pay, regular parental deposits into their own account, and scholarships paid directly to them; parental salary and household income cannot be counted.
- Pre-qualification uses a soft inquiry that does not appear on your credit report and has no effect on your credit score; a full application triggers a hard inquiry that remains on your credit report for two years.
- No minimum credit score is required for Discover student cards, but Discover still checks your credit file for negative marks such as collections or charge-offs that can cause a denial.
- If denied, Discover is required to mail an adverse action notice within 30 days explaining the reason; applicants can pull a free credit report within 60 days at AnnualCreditReport.com to check for errors before reapplying.
Best for:
- College students applying for their first credit card who have little or no credit history and want to build a FICO score while earning cash back rewards.
- Students under 21 who are unsure what income to report on the application and need clarity on what the Credit CARD Act allows them to include.
- Applicants who have been denied for a Discover student card and need a clear path forward, whether through correcting their credit file, building income, or starting with a secured card instead.
The Two Discover Student Cards: Which One Is Right for You
Discover offers two student cards. They share the same core perks, but they reward different spending habits. Picking the right one before you apply means more cash back from day one.
Both cards come with no annual fee, free access to FICO scores, and Discover’s signature Cashback Match for new cardmembers. As Discover explains in its Cashback Match overview, Discover automatically matches all the cash back you earn at the end of your first year, with no minimum spend and no cap. For a student who earns $200 in cash back during year one, that turns into $400. That match is a major reason these cards win over other starter options.
The real choice comes down to how you spend.
The Discover it Student Cash Back card gives you 5% cash back on rotating categories each quarter. This includes grocery stores, gas, restaurants, and Amazon. You can earn this on up to $1,500 in combined purchases after activation. After that cap, the rate drops to 1%. All other purchases earn 1%, as listed on Discover’s official Cashback Calendar page.
The Discover it Student Chrome card keeps things simpler. It earns 2% cash back at gas stations and restaurants on up to $1,000 in combined purchases each quarter, then 1%. Everything else earns 1% automatically, with no activation needed.
Cash Back vs. Chrome: A Side-by-Side Spending Match
Think about where your money actually goes each month. Then match it to the right card.
| Spending pattern | Best card | Why |
|---|---|---|
| You shop a lot of places, change habits each quarter, and don’t mind activating | Cash Back | The 5% rate is the highest cash back rate available on a student card |
| Most spending is gas and food out with friends | Chrome | The flat 2% earns automatically on those two categories, no activation |
| You forget to log in and activate things | Chrome | No quarterly action needed |
| You can plan spending around quarters (stock up at grocery stores in Q1, etc.) | Cash Back | Strategic timing maxes out the $75 quarterly bonus |
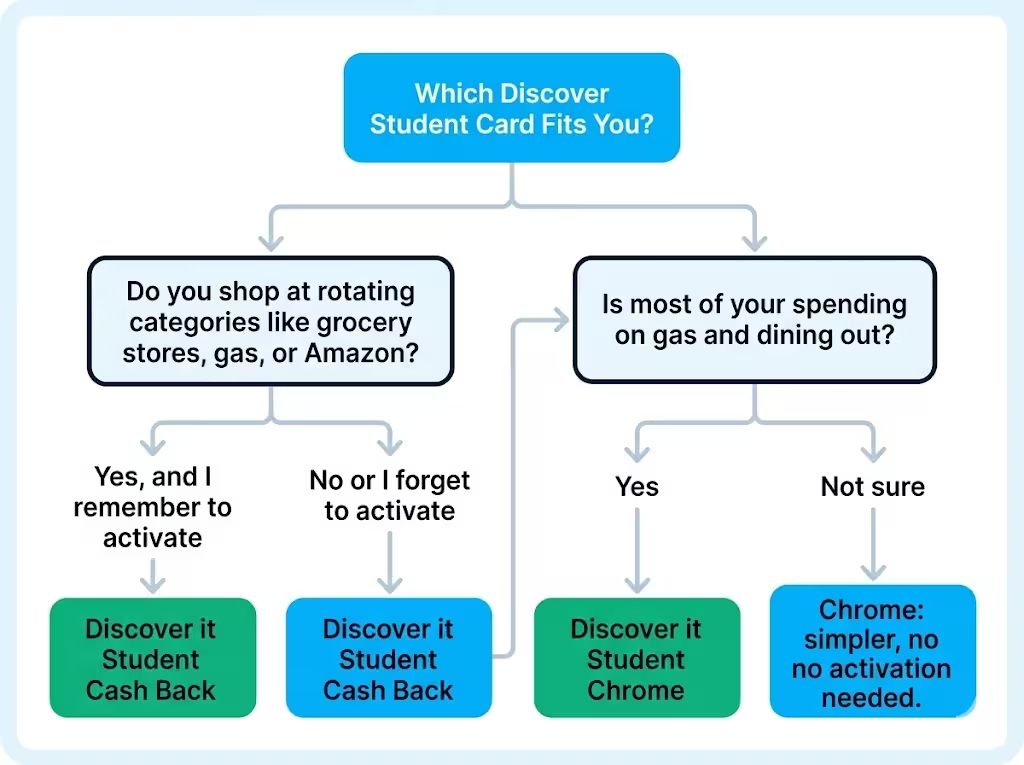
A student who spends $300 a month on gas, dining, and groceries combined would earn very different rewards depending on the card chosen. Cash Back rewards higher spenders who stay active. Chrome rewards consistency. Neither is “better” overall. The right one is the one that fits how you already live.
💡 Pro Tip: If you share rent and grocery costs with roommates, use your card first. Then, when they pay you back, you’ll earn more cash back. This works best in quarters when groceries earn 5%.
Eligibility Requirements for the Discover Student Card
Before you fill out anything, check the four basics. Missing any one of these will get you denied, no matter how strong the rest of your application looks.
To qualify, you must be at least 18 years old. You should be enrolled at a U.S. college or university, either full-time or part-time, and it can be a two-year or four-year school. Also, you need a valid Social Security Number (SSN) and a U.S. street address. Discover doesn’t require a minimum credit score for student card approval. This makes it a great choice for students.
Age and Enrollment: What Qualifies
You must be 18 or older to apply on your own. If you’re 17, you can be added as an authorized user on a parent’s card to start building history, but you can’t open your own account yet.
For enrollment, Discover accepts students at accredited U.S. colleges, universities, community colleges, and trade schools. Online programs at accredited schools usually count too. You may be asked for your school name, expected graduation date, and possibly your student email. Have these details ready before you start.
International students with a valid SSN and U.S. address can apply, though approval is not guaranteed. If you have an ITIN instead of an SSN, Discover student cards aren’t an option, and you’ll want to look at issuers that accept ITIN applications.
Social Security Number and U.S. Address
The SSN is needed because Discover uses it to check your credit file, even if it’s empty. They also need it to verify your identity under federal Know Your Customer rules. A dorm address works as your U.S. address. So does a parent’s home, an off-campus apartment, or any permanent U.S. residence. Just use the address where you actually receive mail, because Discover will send your card and statements there.
If you move mid-semester, that’s fine. Just log in after approval and update the address before your next statement.
No Credit Score Required: What That Actually Means
This is the part most students misread. “No credit score required” does not mean Discover skips the credit check. It means Discover will approve students with a thin file (very little history) or no file at all, which is normal for an 18-year-old.
Discover still checks your file for any negative marks, like collections, charge-offs, or fraud alerts. If you’ve cosigned a loan that went late, or a parent put a utility in your name and didn’t pay it, those issues can show up and cause a denial. So while you don’t need a score, you do need a clean file.
What Counts as Income on the Discover Student Card Application
This is where most students freeze. You’re a full-time student. Maybe you work 10 hours a week at the campus library. Maybe you don’t work at all and live off financial aid and money from your parents. What do you put in the income box?
The rules are set by the federal Credit CARD Act of 2009, which was designed to stop card issuers from giving young adults debt they can’t repay. The exact income rules for under-21 and 21+ applicants are spelled out in CFPB Regulation Z § 1026.51 on ability to pay, which governs every card issuer in the country.
Under 21: The Strict Income Rules
If you’re under 21, you can only report income or assets that you personally have access to. The card issuer is not allowed to count income that belongs to someone else, even your parents. That restriction comes directly from the CFPB’s ability-to-pay rule for under-21 applicants.
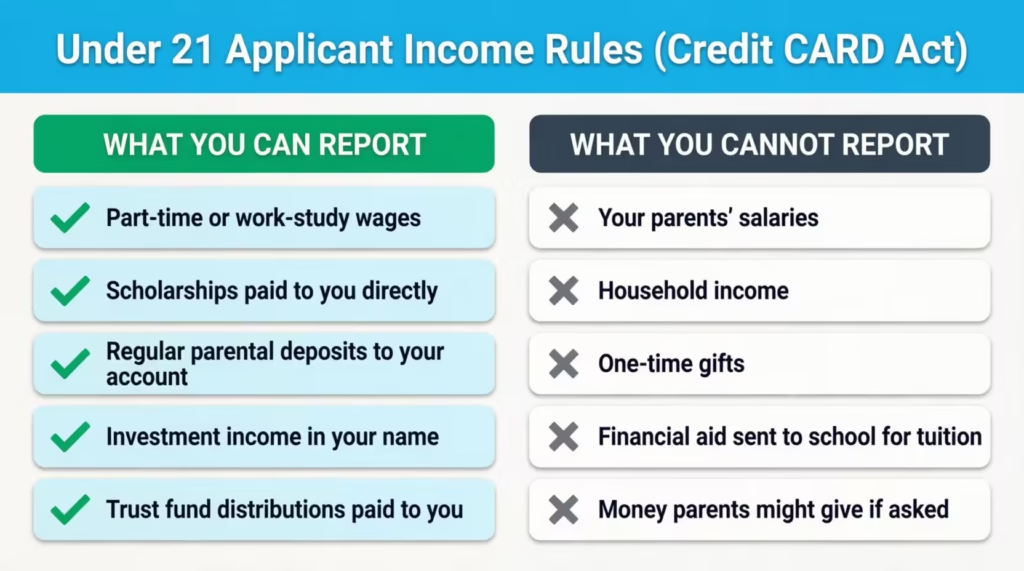
In practice, here’s what you can include:
- Wages from a job, including part-time, work-study, internships, and summer work. Use your gross annual amount (before taxes). A campus job paying $12 an hour for 10 hours a week is about $6,240 a year.
- Scholarships and grants that are paid to you directly or that cover living expenses, not money sent straight to the school for tuition.
- Regular deposits from parents that go into your own bank account on a predictable schedule. A parent sending you $400 a month for groceries and gas is $4,800 a year of accessible income.
- Investment income if you have a brokerage account in your name.
- Trust fund distributions are paid to you.
What you cannot include: your parents’ salaries, household income, one-time gifts, financial aid sent directly to the school for tuition, or money your parents “might give you” if you asked.
⚠️ Mistake to Avoid: Do not report $0 income just because you don’t have a traditional job. If a parent reliably deposits money into your account, that counts as accessible income and can be reported. Reporting $0 when you have real monthly support is the most common reason under-21 students get denied.
21 and Older: Additional Income You Can Report
Once you turn 21, the rules loosen significantly. A CFPB amendment to the CARD Act rule lets applicants 21 or older report any income they have a reasonable expectation of access to, including a spouse’s or partner’s income for household expenses.
For a 21-year-old senior, that means you can report your own wages plus shared household income if applicable. You still can’t make up numbers, but you have more room to report the full financial picture you actually live with.
Use the Pre-Qualification Tool Before You Apply
This is the single most important step in this whole guide. Before you submit a real application, run your name through Discover’s pre-qualification tool.
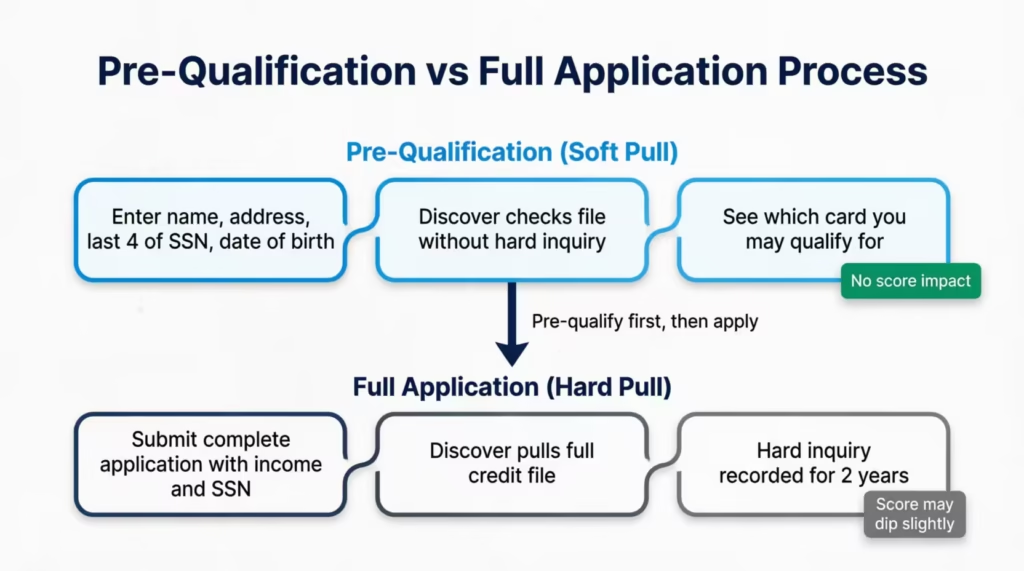
Pre-qualification uses a soft credit check (sometimes called a soft inquiry or soft pull). A soft pull is visible only to you and does not affect your credit score in any way. A real application, by contrast, triggers a hard inquiry, which can drop a thin-file score by a few points and stays on your report for two years.
To pre-qualify, go to Discover’s site, click “See if you’re pre-approved,” and enter your name, address, last four of your SSN, and date of birth. In about 60 seconds, Discover will tell you which student card (if any) you’re likely to be approved for. If you don’t pre-qualify, you’ve learned that for free. No score damage. No record of an application.
If you do pre-qualify, your odds of final approval go way up. Pre-qualification doesn’t guarantee approval. The full application checks your complete credit file and confirms your reported income. But students who pre-qualify and then submit truthful applications get approved at very high rates.
📌 Did You Know: Discover’s pre-qualification check does not appear on your credit report at all. You can run it as many times as you want without any score impact, which is useful if you want to recheck after updating your income or address.
What to Gather Before You Start the Application
The Discover application takes about 10 minutes if you have everything ready. It takes 30 minutes of stress and tab-switching if you don’t. Pull these items before you click “Apply.”
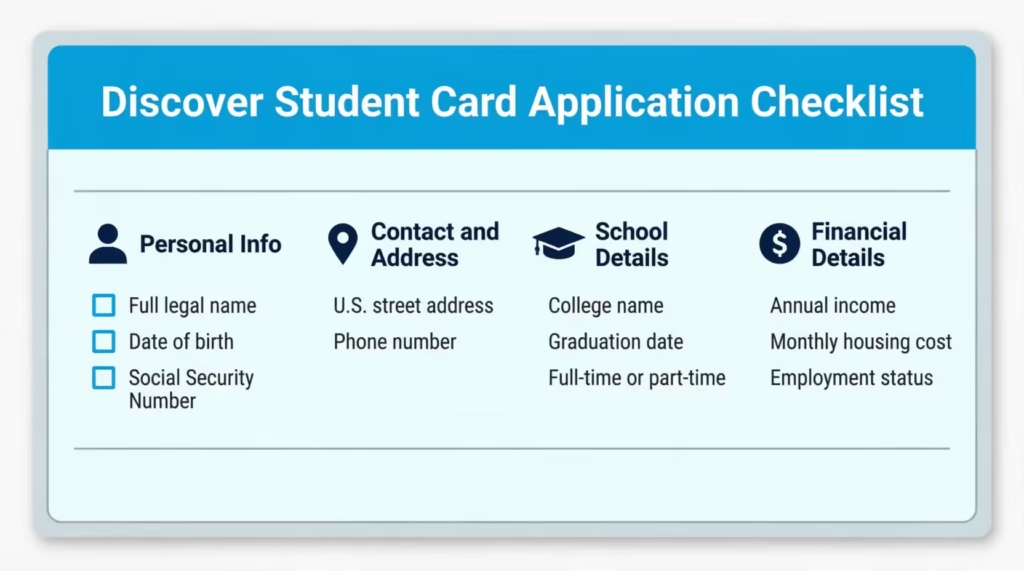
Personal information:
- Full legal name as it appears on your Social Security card
- Date of birth
- Social Security Number
- A working email address you check often
Contact and address:
- Current U.S. street address (dorm, apartment, or family home)
- Phone number where Discover can reach you, usually your cell phone
School details:
- Name of your college or university
- Expected graduation month and year
- Your status: full-time or part-time
Financial details:
- Your total annual income (calculated using the rules in the section above)
- Monthly housing cost (rent, dorm fee, or $0 if you live with family rent-free)
- Employment status (student, employed part-time, self-employed, etc.)
- Employer name and how long, if you work
Bank account status:
- Whether you have a checking or savings account, and roughly how long you’ve had it. Having a bank account in your name boosts your application, even if Discover doesn’t check your bank records for approval.
Write these down or keep them in a notes app before you start. The application form will time out if you sit on a page for too long.
How to Apply for the Discover Student Credit Card, Step by Step
Follow these six steps in order. Each one matches what you’ll actually see on Discover’s site.
Step 1. Start on Discover’s official site. Go to discover.com and click “Credit Cards,” then “Student Credit Cards.” Pick the card you chose earlier (Cash Back or Chrome). Click “Apply Now.” Make sure the URL begins with discover.com to avoid phishing sites that imitate the application page.
Step 2. Enter your personal information. Type your full legal name, date of birth, and Social Security Number into the first block. Use the name on your Social Security card, not a nickname. Discover cross-checks this with the SSA.
Step 3. Provide your address and contact info. Enter your current mailing address, phone number, and email. Confirm that you’re a U.S. citizen or permanent resident (the application asks). Choose the address where you want your card mailed, since Discover sends it within 5 to 7 business days of approval.
Step 4. Add school details. Select your school from a dropdown or type it in. Enter your expected graduation date and enrollment status. If your school doesn’t appear in the dropdown, choose “Other” and type the full name manually.
Step 5. Complete the financial section. This is where the income and housing fields appear. The next subsection breaks this down.
Step 6. Review and submit. Read the terms and the APR disclosure (Schumer box). Confirm the information on the screen matches what you entered. Click submit. Most students get a decision in under 60 seconds, though some applications take longer (see the next major section).
Completing the Income and Housing Fields
Use the income rules from the earlier section to put a real, defensible number in the income box. Don’t round wildly.
If you make $4,800 a year in parental deposits and $3,000 from a campus job, enter $7,800, not $20,000, to look better. Discover might ask for verification, like a bank statement, offer letter, or parental letter. If your numbers are inflated, it could result in denial or account closure, even after you’ve been approved.
For housing, enter your actual monthly cost:
- Living in a dorm: Divide your annual dorm fee by 12. If your dorm costs $9,000 a year, enter $750 a month.
- Off-campus apartment: Your share of the rent (not the whole apartment if you have roommates).
- Living at home rent-free: Enter $0. This is fine and very common for student applicants.
Be honest. The housing field is used to estimate your debt-to-income ratio, not to disqualify you for low rent.
What Happens After You Submit Your Application
Three things can happen the moment you click submit.
Instant approval. Most student applicants get a decision within 60 seconds. The screen will display “Congratulations” and your approved credit limit. For students, this usually ranges from $500 to $2,500, based on your reported income and filing status. Your physical card arrives within 5 to 7 business days.
Pending decision. Discover sometimes needs more time to verify identity or income. You’ll see a message that says your application is under review, and Discover has up to 30 days to give you a final answer under federal law. You may get a call or an email asking for documents like a recent pay stub, a copy of your student ID, or a bank statement. Respond fast (within 7 days) to keep the application alive.
Denial. If your application is denied, Discover will mail you an adverse action notice within 30 days explaining the reason. Don’t panic. The denial doesn’t lock you out forever, and the next sections cover exactly what to do.
After Approval: Activating Your Card and Using It to Build Credit
When the card arrives, activate it through the Discover mobile app or by calling the number on the activation sticker. Set up your online account at the same time. Turn on:
- Autopay for at least the minimum payment (so you never miss a due date)
- Email or text alerts for new charges, payment due dates, and statement posts
- Free FICO score tracking is included with every Discover card
To build credit fast, follow three rules from day one:
- Pay the full statement balance every month, not just the minimum. This avoids interest entirely and reports a paid balance to the credit bureaus.
- Keep your utilization under 30%, ideally under 10%. If your limit is $1,000, try to keep your statement balance under $100 most months. Utilization is the second-biggest factor in your FICO score.
- Never miss a payment. Even one 30-day late payment can drop a new score by 60 to 100 points and stay on your file for seven years.
Used this way, a Discover student card typically builds a FICO score above 700 within 12 to 18 months for someone starting from scratch.
What to Do If Your Application Is Denied
A denial isn’t the end. Most student denials come from one of two specific reasons, and both have clear fixes. Discover is required to tell you the exact reason in your adverse action notice. Read it carefully when it arrives.
You’re also entitled to a free copy of the credit report that Discover used to decide. Order it within 60 days of the denial at AnnualCreditReport.com, the only federally authorized free credit report site. Check that report for errors before you reapply. About 1 in 5 reports has at least one mistake, and fixing it can change your next decision.
Denied for Insufficient Income
This is the top reason under-21 students get denied. The fix depends on what you actually have access to.
If you forgot to include reliable parental deposits, recalculate and reapply in 60 days with the more accurate number. If your only income is really too low, look at three options:
- Get a part-time campus job. Even 8 hours a week at minimum wage moves you above the typical denial threshold.
- Open a Discover Secured Card instead (see the next major section). It uses your deposit, not your income, as the qualifier.
- Become an authorized user on a parent’s existing card while you build your own profile.
Wait at least 60 days before reapplying to Discover. Reapplying too quickly with the same information usually just produces a second denial and another hard inquiry.
Denied for Thin or Negative Credit File
If your file has negative marks, like a collection account, a charged-off store card, or fraud, those need to be addressed first. Pull your free reports from all three bureaus at AnnualCreditReport.com and look for:
- Accounts you don’t recognize: This may be identity theft. File a dispute with the bureau and a report at IdentityTheft.gov.
- Collections: Contact the collector, ask for a “pay for delete” if possible, or settle and wait for the mark to age.
- Late payments on accounts you cosigned: Talk to the primary borrower. Once the account is current for several months, your score will recover.
If your file is just thin (no real history), the fix is to add some. Becoming an authorized user on a parent’s card with a long, clean history can add years of positive payment data to your file almost overnight. Then reapply to Discover after 60 to 90 days.
Alternatives If You Cannot Qualify Right Now
If a student card isn’t realistic today, two alternatives can still get you to a strong credit profile within a year.
Discover it Secured Credit Card. This card requires a refundable security deposit, usually $200 minimum, which becomes your credit limit. No annual fee! You earn 2% cash back at gas stations and restaurants, up to $1,000 quarterly. Plus, you get 1% on all other purchases. It also features the same first-year Cashback Match as the student cards.
Discover automatically reviews secured accounts from month seven. If you’ve paid on time, you may graduate to an unsecured card and get your deposit back. This is the most powerful starter card available for anyone with no income or a thin file.
Authorized user on a parent’s card. Ask a parent (or other trusted family member) with a long, clean credit history to add you as an authorized user on one of their existing cards. You usually don’t even need a physical card in your hand.
If the issuer reports authorized users to credit bureaus, your full account history will be added. Most issuers, like Discover, Chase, and American Express, do this.
A parent with a 10-year-old card and perfect payment history can give you an instant credit foundation. Once your file has a few months of positive data, you can reapply for your own Discover student card with much stronger odds.
Either path works. Pick the one that fits your situation, give it six to nine months, and then come back to the Discover student application with a much stronger file.
Frequently Asked Questions (FAQs)
What is the minimum income for a Discover student credit card?
Discover does not publish a specific minimum income figure for its student cards. If you’re under 21, you can report your wages, work-study pay, regular parental deposits, and scholarship funds you receive directly. Even a small amount can help you qualify.
Does Discover ask for proof of income for a student credit card?
Discover doesn’t need income documents at first. However, if your application is reviewed, they might ask for a recent pay stub, a bank statement, or a parental support letter. Responding within seven days keeps the application active.
Does checking if you pre-qualify for a Discover student card hurt your credit score?
No. Discover’s pre-qualification uses a soft inquiry that does not appear on your credit report and has zero effect on your score. Only a full application triggers a hard inquiry, which is why running the pre-qualification tool first is the safer move.
Is it hard to get a Discover student credit card?
Discover student cards are a great first option. They need no minimum credit score and accept thin credit files. The main barriers are being under 21 with very low reportable income or having negative marks like collections on your credit file.
What is the starting credit limit on a Discover student card?
Discover typically assigns student cardholders a credit limit between $500 and $2,500 at approval. The exact amount depends on the income you report and what Discover finds in your credit file.
Is Capital One or Discover better for students?
Discover’s student cards include a first-year Cashback Match that doubles all cash back you earn, no annual fee, and free FICO score tracking. Capital One has great student cards. The best choice depends on which rewards match your spending habits.
Should I get a Discover student card?
A Discover student card is a strong choice if you want to build credit with no annual fee, earn cash back from day one, and get your FICO score for free. The first-year Cashback Match makes it especially valuable compared to most starter cards that offer no rewards at all.
What should I do if my Discover student card application shows as pending?
A pending status means Discover is checking your identity or income. They might reach out for documents like a pay stub, student ID, or bank statement. Respond within seven days to keep your application active.
Wrapping Up
In writing this guide, we focused on the questions students actually search for at 11 p.m. the night before they hit “Apply.” The way forward is simple: pick Cash Back or Chrome based on your spending habits. Check your eligibility. Honestly, calculate your income under the Credit CARD Act. Use the pre-qualification tool to protect your score.
Gather your details, then submit. If you’re denied, check the adverse action notice. Then, get your free reports. Use a secured card or become an authorized user to strengthen your file. For most students, the best way is to pre-qualify first. First, match the right Discover student credit card to your spending. Then, submit your full application with an accurate income figure.
If you know a classmate stressing over their first card, share this guide. It could save them from a denial and protect a credit score they haven’t even started yet.