
I’ve spent years helping small business owners clean up messy books, and the Capital One to QuickBooks connection is one of the most common setup snags I see. You want your card charges to land in QuickBooks Online on their own, but the link button won’t cooperate, the history only goes back a few months, or two cards keep merging into one feed.
The solution is simple: link Capital One to QuickBooks Online using the Bank Transactions tab. Then, upload an older charges file manually.
Keep reading for the exact clicks, the 90-day workaround, multi-card setup, and a clear troubleshooting path.
Key Takeaways
This guide explains how to connect a Capital One credit card to QuickBooks Online, covering the automatic bank feed setup, the 90-day history limitation and manual file upload workaround, multi-card configuration, and fixes for the three most common connection problems.
Core Facts:
- The automatic bank feed links Capital One to QuickBooks Online through the Bank Transactions tab and pulls in new charges once per day after setup, requiring no ongoing manual action.
- The live feed retrieves only the past 90 days of transaction history from the connection date; charges older than 90 days must be imported manually using a downloaded file from capitalone.com.
- Capital One supports four export file formats for manual import: CSV, QBO, QFX, and OFX. QBO requires no column mapping in QuickBooks; CSV requires matching date, description, and amount columns during the upload wizard.
- When connecting multiple Capital One cards, each card must be checked during the Capital One authorization step and mapped to its own separate Chart of Accounts entry in QuickBooks for accurate reporting.
- If the Connect button is grayed out, the most likely causes are insufficient QuickBooks user permissions, an expired subscription, or selecting the wrong Capital One product during the bank search.
- A dropped feed (transactions stop syncing) is most often fixed by clicking the pencil icon on the Capital One tile in QuickBooks and re-entering login credentials; if that fails, disconnecting and reconnecting the card resets the feed without deleting past transactions.
Best for:
- Small business owners setting up QuickBooks Online for the first time and wanting their Capital One card charges to flow in automatically without manual data entry.
- Business owners who are behind on bookkeeping and need to import several months of Capital One transaction history that falls outside the 90-day automatic feed window.
- QuickBooks users whose Capital One bank feed has stopped syncing or who are getting errors during the initial connection and need a clear troubleshooting path.
What You Need Before You Connect Capital One to QuickBooks Online
Before you start the link, a few things need to be in place. Skipping this checklist is the top reason people get stuck halfway through setup.
You need an active QuickBooks Online subscription on any paid tier (Simple Start, Essentials, Plus, or Advanced). The trial version also works. Make sure your sign-in has admin rights, because standard users can’t add a new bank or credit card feed.
Next, confirm your Capital One login details. Your username and password must be the same ones you use on capitalone.com. If you have two-factor authentication turned on (and you should), keep your phone close so you can approve the code request during setup.
Your Chart of Accounts should already include a credit card account for the card you’re linking. If it doesn’t, set one up first. Go to the gear icon, click Chart of Accounts, then New, and pick Credit Card as the account type. Name it something clear, like “Capital One Spark Cash,” so you can spot it fast in reports.
Finally, check your browser. The bank feed works best in the latest Chrome, Firefox, Safari, or Edge. Older browsers often break the Capital One redirect. Clear your cache before you begin, and turn off ad blockers for both quickbooks.intuit.com and capitalone.com.
💡 Pro Tip: Open QuickBooks and Capital One in two separate browser tabs before you start. If the connection hiccups, you can refresh your Capital One login without losing your place inside QBO.
Automatic vs. Manual Import: Which Method Should You Use
You have two ways to get your charges into QuickBooks: a live sync of Capital One transactions to the QuickBooks Online feed, or a one-time file upload. The right pick depends on how far back you need to go and how often you want fresh data.
The automatic feed pulls charges into QBO once per day, usually overnight. Once it’s set up, you don’t have to touch it. New swipes, refunds, and payments flow in on their own, and QuickBooks tags each one as ready for review. This works great for everyday bookkeeping.
The catch is timing. The automatic feed only reaches back about 90 days from the day you connect. Anything older won’t appear, no matter how long the card has been open. If you’re starting your books mid-year or catching up on past quarters, the live feed alone won’t be enough.
That’s where importing Capital One transactions into QuickBooks by file comes in. You log into capitalone.com, download the older charges as a file, and upload them straight into QBO. QuickBooks accepts four main formats: CSV file upload, QBO, QFX, and OFX. Capital One offers all four, so you can pick whichever your software handles best.
Many users combine both methods. They turn on the live feed for daily flow, then do one CSV file upload to fill in the older months. Just watch for duplicates. If the live feed and your file share the same dates, QBO may pull in the same charge twice. Always check the date range on your file before you upload it.
Below is a quick way to decide:
| Your Situation | Best Method |
|---|---|
| Starting fresh, only need recent charges | Automatic feed |
| Catching up on the past 6–12 months | Manual import (then turn on feed) |
| Feed keeps breaking | Manual import as backup |
| Want hands-off bookkeeping going forward | Automatic feed |
How to Connect Your Capital One Credit Card to QuickBooks Online (Automatic Method)
This is the main path most readers want. The full setup takes about five minutes if your login info is ready.
Navigate to the Bank Transactions Page in QuickBooks Online
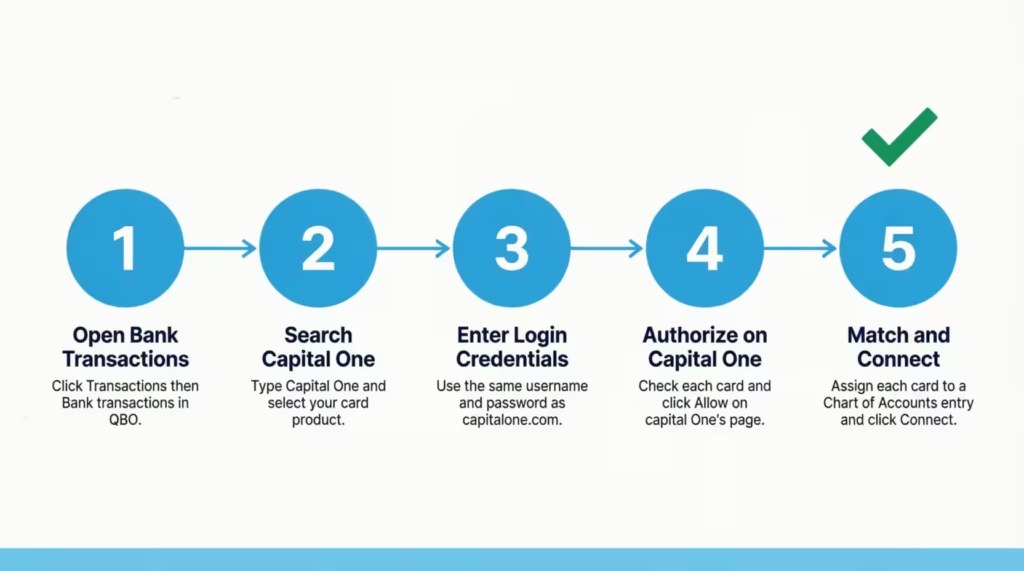
Sign in to QuickBooks Online. On the left menu, click Transactions, then pick Bank transactions. If this is your first time adding any account, you’ll see a big green Connect account button in the middle of the screen. If you already have other accounts linked, look for the Link account in the top right corner of the page. Click it to start.
Search for Capital One and Enter Your Login Credentials
A search box pops up asking which bank you want to add. Type Capital One and wait a second for the list to load. You’ll see several options, like “Capital One Card,” “Capital One 360,” and “Capital One Spark Business.” Pick the one that matches your card. Business card holders almost always pick the Capital One Card (Credit Card) unless they have a Spark Business product.
Click the right option, and QuickBooks will ask for your Capital One username and password. These are the same details you use on the Capital One website or app. Type them carefully. A wrong password three times can lock your card account for safety.
Authorize the Connection on Capital One’s Website
This step trips up a lot of people, so read it slowly. After you enter your login, QuickBooks sends you over to capitalone.com in a new window. This is normal. Capital One needs to confirm directly with you that QuickBooks can read your charges.
On Capital One’s page, you’ll see a list of the cards on your login. Check the box next to each card you want to share with QuickBooks. Then click Allow or I Agree at the bottom. If you have two-factor authentication on, Capital One will text or email a code. Type that code in to finish the approval.
Once you click allow, the page sends you back to QuickBooks on its own. Don’t close the window during the redirect. If you do, you’ll have to start over.
⚠️ Mistake to Avoid: Skipping cards on the Capital One authorization screen. If you uncheck a card here, QBO can’t add it later without redoing this whole step. Approve every card you might ever want in QuickBooks.
Select Your Account and Confirm the Connection
Now you’re back in QuickBooks. You’ll see each Capital One card listed with a drop-down next to it. The drop-down asks which Chart of Accounts entry the card should connect to. Pick the credit card account you set up earlier. If you forgot to make one, click + Add new right from the drop-down and create it on the spot.
After you match every card to its account, click Connect. QuickBooks will spin for a minute while it pulls in the first batch of charges.
What to Expect After the Connection Is Complete
Once the link finishes, QBO drops you onto the Bank transactions page. You’ll see all your recent Capital One charges in the For Review tab. Each one shows the date, payee, and amount, but no category yet. That’s your job to set.
The feed will pull new charges once a day after this point. You don’t need to log back into Capital One. If a charge is missing, give it 24 hours. Capital One sometimes posts charges to QuickBooks a day after they appear on your card statement.
How to Import Capital One Transactions into QuickBooks Online Manually
If you need older charges or your live feed isn’t working, the manual route fills the gap. This method works for every QBO plan and never breaks.
Why Capital One’s Automatic Feed Only Goes Back 90 Days
Capital One limits what banks and apps can pull through their data link to about three months of past activity. This isn’t a QuickBooks rule; it’s set on Capital One’s side for safety and data load reasons. So when you first link your card, you’ll only see charges from the past 90 days, even if the card has been open for years.
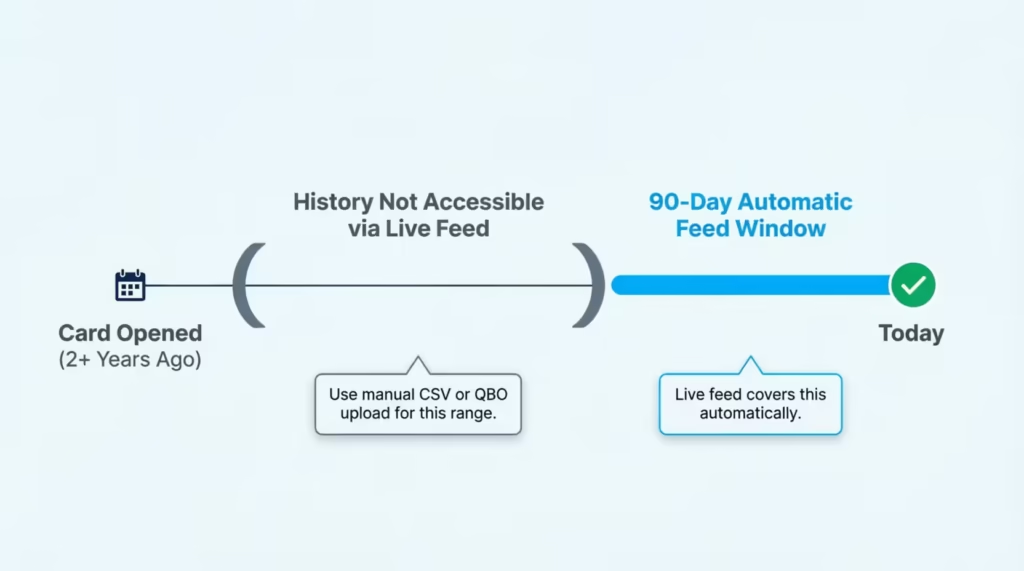
For day-to-day use, this is fine. But if you’re behind on books or just switched from another system, you need a different path for older months. That’s the manual upload.
Download Your Transaction History from Capital One
Log in to capitalone.com in a fresh browser tab. Click on the card you want to export. On the left or top menu, look for View Statements or Download Transactions. The exact spot moves now and then, but it’s always near your statement list.
Pick the date range you need. You can usually pull up to 24 months of charges at once. For the file type, choose one of these:
- CSV: Works in Excel or Google Sheets. Easiest to clean up before upload.
- QBO: Built for QuickBooks. Plug-and-play, no editing needed.
- QFX: Quicken format. Also works in QBO.
- OFX: Open Finance format. Backup option if the others fail.
Most people pick CSV or QBO. Save the file to your desktop, where you can find it fast.
Upload the File to QuickBooks Online
Go back to QuickBooks. Click Transactions, then Bank transactions. In the top right, click the small drop-down arrow next to Link account and pick Upload from file.
QBO walks you through a short wizard. Drag and drop your file, or click to browse and pick it. Next, pick the QuickBooks account where the charges should land (the same credit card account you set up earlier).
If you uploaded a CSV, QuickBooks asks you to map the columns. Match the date column to Date, the description column to Description, and the amount column to Amount. Capital One CSVs sometimes split debits and credits into two columns. If yours does, pick the two-column option in the wizard, so QBO reads both sides right.
Click Next, review the preview, and hit Import. The charges show up in the For Review tab right next to your live feed entries, ready for you to sort.
Connecting Multiple Capital One Credit Cards in QuickBooks Online
Lots of small business owners carry two or three Capital One cards. Maybe one for travel, one for supplies, and one personal card you use sometimes. Linking them takes a bit of planning.
How Capital One Structures Multi-Card Accounts for Bank Feeds
Capital One sets up some cards as subaccounts under one main login. For example, a Spark business card might have a parent account, with one card for the owner and a second card for an employee. Both cards share one statement, but each has its own charge list.
QuickBooks can see this split when you link. During the authorization step, you’ll see each card listed on its own line. Tick every card. Then, on the QBO side, give each card its own credit card account in your Chart of Accounts. This keeps reports clean. You’ll know exactly how much the owner card spent versus the employee card, even though Capital One bills them together.
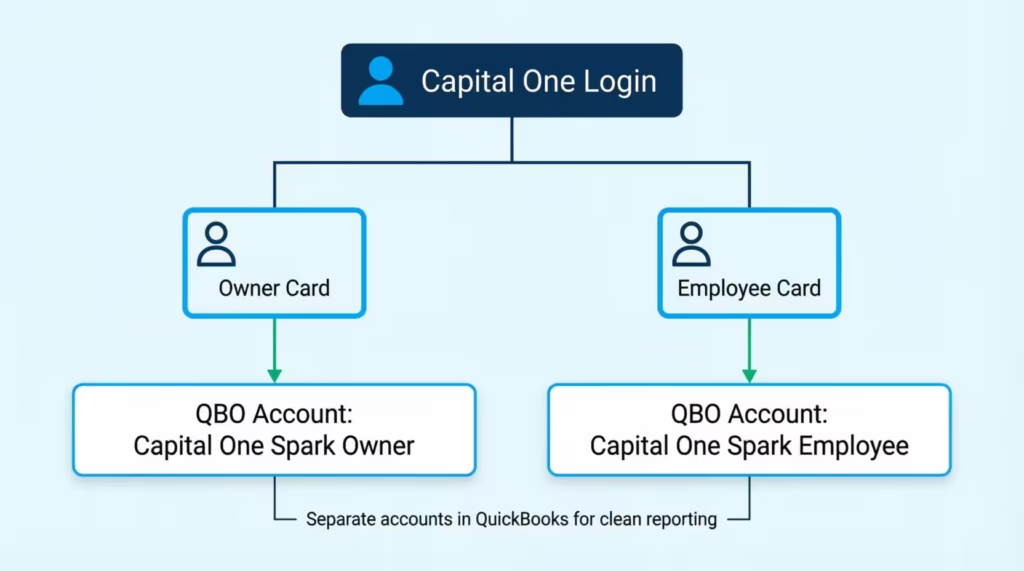
If you only want the total and don’t care which user spent what, you can map both cards to the same QBO account. Most bookkeepers don’t do this, since it makes problem-spotting harder later.
Connecting Cards Under Two Different Capital One Logins
Sometimes the cards aren’t under one login. Maybe you have a personal Capital One card with one username and a separate Spark Business card with a different username. This is common, and QBO handles it fine, but you’ll repeat the linking steps twice.
Go through the full link account flow once for the first login. Approve the cards on Capital One’s site. Match them to the right QBO accounts.
Then come back to the Bank transactions page and click Link account again. Search for Capital One a second time. This time, sign in with the second username. QuickBooks treats each login as its own data source, so both feeds run side by side without conflict.
📌 Did You Know: QBO can hold an unlimited number of bank and credit card connections on every paid plan. The myth that you can only link three or four accounts comes from older desktop versions, not QuickBooks Online.
What to Do After Capital One Transactions Appear in QuickBooks Online
The connection is just the start. The real bookkeeping work begins in the For Review queue. Every charge that flows in sits there waiting for you to tell QBO what it is.
Open the Bank transactions page and click For Review. Each row shows the date, what Capital One sent as the description, and the amount. Click any row to expand it. You’ll see a drop-down where you pick the category, like “Office Supplies,” “Travel,” or “Software.” You can also add a vendor name, tag a project, or split the charge across two accounts.
Once a charge looks right, click Add. It moves from For Review into your books and counts toward your reports right away. If a charge already matches something you typed into QBO by hand (say, a check you wrote), QBO shows Match instead. Click that to link the two so the charge doesn’t double up.
Do this once a week, not once a month. A weekly review takes about ten minutes and keeps your books from piling up. Reconciliation at month-end then goes from a two-hour chore to a quick check, since most of the work is already done.
How to Set Up Bank Rules to Automate Future Categorization
If you charge the same gas station every week, you don’t need to sort it by hand each time. Bank rules do it for you.
From the Bank transactions page, click the Rules tab at the top, then New rule. Give the rule a name like “Shell Gas.” Set it to apply to money out transactions in your Capital One account. Add a condition: “Description contains Shell.” Then pick the category (like “Auto: Fuel”) and the vendor.
Save the rule. From now on, every charge from Shell on that card lands in the right place, ready to confirm with one click. You can build rules for software subscriptions, rideshares, recurring vendors, and more. Most bookkeepers set up 10 to 15 rules in the first month, and after that, the For Review queue shrinks by half each week.
For example, Sarah, a finance director at a 40-person marketing agency, set up 18 bank rules in her first month using Capital One on QBO. Her weekly review time dropped from 90 minutes to 25 minutes, and she cut $3,200 in misposted charges over the next quarter just by getting categories right the first time.
Troubleshooting Common Capital One and QuickBooks Connection Problems
Even with a clean setup, the Capital One QuickBooks integration can hit a snag. The fixes below cover the three biggest issues, in the order you should try them.
The Connect Button Is Grayed Out
If you click Link account, and the Connect button won’t light up, the cause is almost always one of three things.
First, check your QBO user role. Only the master admin or a user with full bank access can link new accounts. If you’re a standard user, ask the admin to either run the setup or raise your access level under the gear icon, then Manage users.
Second, check your subscription. A QBO trial that has run out will lock the Connect button. Renew or pick a paid plan to free it up.
Third, look at the Capital One card name in the search. If you picked the wrong product (say, Capital One 360 when you have a Spark card), the Connect button stays gray because the wrong product doesn’t match your login. Back out, search again, and pick the right one.
The Connection Drops or Transactions Stop Syncing
Some mornings you’ll log in and see no fresh charges. Don’t panic, this happens often and usually fixes in a few clicks.
On the Bank transactions page, find your Capital One card tile at the top. Click the small pencil icon, then Edit sign-in info. Re-enter your Capital One username and password. About 70% of dropped feeds come back right here, because Capital One forced a password reset or asked for fresh two-factor approval.
If a sign-in refresh doesn’t work, click Update on the tile to push QBO to pull again. If charges still don’t show after 24 hours, disconnect the card (click the pencil, then Disconnect this account) and link it fresh. Your past charges stay safe in QBO. Only the live feed resets.
Fixing Browser and Cache Issues Blocking the Connection
Sometimes the link breaks not because of QBO or Capital One, but because of your browser. If the Capital One redirect freezes or you get an error like “Something went wrong” right after you click Allow, the fix is on your end.
Clear your browser cache and cookies for the last 24 hours. In Chrome, hit Ctrl+Shift+Delete (or Cmd+Shift+Delete on a Mac), pick Cookies and other site data and Cached images and files, then click Clear data. Restart the browser.
Next, turn off any ad blocker or privacy add-on for both quickbooks.intuit.com and capitalone.com. Many privacy tools block the redirect token that Capital One sends back to QBO, which kills the link mid-step.
If clearing the cache doesn’t work, try a different browser. Switch from Chrome to Firefox, or open an incognito or private window. About 1 in 5 connection failures fix themselves with just a clean browser session.
Frequently Asked Questions (FAQs)
Should I connect my credit card to QuickBooks?
Connecting your Capital One card to QuickBooks Online lets new charges flow in automatically each day, which eliminates manual entry and gives you an always-current view of spending. Most small business owners see a significant drop in weekly bookkeeping time after adding 10 to 15 bank rules in the first month.
Why are my credit card transactions not showing up in QuickBooks Online?
The most common cause is a dropped connection between Capital One and QuickBooks. To fix this, go to Bank transactions, click the pencil icon on your Capital One tile, and re-enter your login details. If charges still don’t appear after 24 hours, disconnect the card and reconnect it fresh; your past transactions stay intact.
Why did my credit card transactions disappear from QuickBooks Online?
Capital One periodically requires fresh login approval, which can cut the data feed without warning. Click the pencil icon on your Capital One tile in QuickBooks, re-enter your username and password, and the missing transactions typically resume within 24 hours.
How do I add missing credit card transactions in QuickBooks Online?
Download the missing date range directly from Capital One as a CSV or QBO file, then go to Bank transactions in QuickBooks and choose Upload from file under the Link account drop-down. Check the date range on your file before uploading to avoid importing charges for the live feed already pulled in.
How do I export all transactions from Capital One?
Log in to capitalone.com, select the card you want, and look for Download Transactions near your statement list. You can typically export up to 24 months of charges at once in CSV, QBO, QFX, or OFX format.
Can I download my Capital One statement as a CSV?
Yes. From capitalone.com, open the card you want, find the Download Transactions option near your statements, and select CSV as the file type. The CSV opens in Excel or Google Sheets and can also be uploaded directly into QuickBooks Online.
Can you run a credit card on QuickBooks?
QuickBooks Online can connect to credit card accounts to pull in charges automatically, and it also lets you manually upload transaction files. It doesn’t process payments directly. Instead, it records and sorts spending that’s already occurred on your card.
How far back does the Capital One QuickBooks connection pull transaction history?
The automatic feed pulls about 90 days of past charges from your connection date. Anything older won’t show up in the live link. To bring in earlier months, download a transaction file from capitalone.com and upload it manually to QuickBooks.
What file formats does Capital One support for exporting transactions to QuickBooks?
Capital One offers four export formats: CSV, QBO, QFX, and OFX. The QBO format is made for QuickBooks, so it needs no column mapping. CSV is great if you want to check or clean the data in Excel first.
Bottom Line
Linking Capital One to QuickBooks Online takes about five minutes. Just follow these steps:
- Prepare your Chart of Accounts.
- Use the Bank Transactions tab for the automatic link.
- Approve your cards on capitalone.com.
- Quickly upload any older months if needed.
For most readers, running the live feed daily and adding 10 to 15 bank rules in the first month is best. This approach cuts review time in half and keeps your books up to date with little effort.
If you know a fellow business owner still typing card charges into a spreadsheet by hand, share this guide with them; it could save them hours every week.